


Tutorial: tailored welt pockets
- esmesvintagecloset
- May 12, 2023
- 5 min read
Updated: Jan 16, 2024
Welcome back to my blog!
I know that I have been absent for quite some time... I'm not quite done with the whole cancer malarkey yet, but things are definitely moving in the right direction.
Whilst I have been offline over the past 12 months or so, I have still been working on ideas for this blog and future projects. I am no further forward with the jacket I had intended to submit as my Foundations Revealed competition entry and that is sat waiting for me to pick up the threads, as it were, again.
All that said. I thought it might be fun to do some tutorial type posts in between project posts, showing how I was taught to do various things during my time with the tailors.
STEP ONE:

Work out the size you want your finished pocket to be. If you are using a commercial pattern, the chances are the placement will be marked on the pattern. Measure your pattern markings to determine the width of your finished welt and pocket. The purple dots indicate where the pattern dictated this pocket should sit. I have already prepared the jacket front piece by putting the darts in and fusing weft insertion to the wrong side of the fabric for stability. I have also fused a piece of cotton interfacing approdximately 1" deep and 1/2" longer each end than the purple dots on the wrong side of my fabric so as to minimise fraying.
If a pattern piece is not provided, you need to work out the size you need to cut your fabric. I work on the following calculations :
Pocket width plus half an inch
Welt depth x 2 plus half an inch
For this pocket, I wanted a 3/4" welt that was 4" wide. So fabric pieces were cut to 5" by 2". I also cut fusible cotton interfacing to the same size and fixed that to the wrong side of my fabric.
STEP TWO :

Fold your fabric, lengthwise with the right side inside.
Stitch along the short ends, with a 1/2" seam allowance from top to bottom.
Turn your welt so that the wrong sides are together and press.

Mark in pencil where your stitch line will be, 3/4" from the folded top edge (or however deep you want your finished welt to be). You will want your stitch line
on this mark, but when stitching you will be unable to see it. But it will allow you to ensure that your welt is perfectly even along the width.
STEP THREE :

Check your welt against the pattern placement dots on your jacket front, making sure that your stitch line aligns with the dot at each end.

Your pocket bags need to be 1/2" wider than your welt at each end. Two matching pieces (I prefer a rounded off square shape to the inside of my pockets
Place one of your pocket bag pieces right side down on top of the welt, which is already in position.

Align the raw edge of your pocket back with the raw edge of the welt.
STEP FOUR :

Stitch 1/4" from the raw edge. Be careful not to stitch off the edge of the welt at either end.
Flip the pocket bag up to double check you have stitched on the line marked on your welt. If necessary, restitch.
STEP FIVE :
Place the second piece of your pocket
bag on your fabric, ensuring that the ends are lined up with the piece already stitched.
Lift the seam allowance of the welt away from your fabric, and butt the second pocket bag piece as close as possible to your first stitch line.

STEP SIX :
Keeping the edge of your presser foot (mine is 1/4" from edge of foot to needle) against the folded back welt, and ensuring that your second pocket bag piece remains butted up against the stitch line of the welt, stitch the second pocket bag piece into place.
Start your stitching slightly further foward from your original stitching. I tend to step forward around 2 or 3 mm.
Finish your stitching around 2 or 3mm short of your finish point on the welt.

That way, once cut and flipped through, you will not have any stitching visible on the outside of your fabric.
STEP SEVEN :

Flip the jacket front over. (You can see
here that I have backed my linen fabric with fusible weft insertion and where my pocket is to sit, fused an additional piece of cotton interfacing in place.)
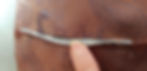
Cut a slit into the fabric. Stop cutting around 1/2" from each end and cut a "v" shape. Snip as close to the end of the last stitch as you dare! The closer you are able to get, the neater your finished pocket will be as everything will lay nice and flat.
STEP EIGHT :

Topstitching!
Push the second pocket bag piece through the slit you have just cut.
Press so that it lies flat.
Topstitch, being careful to not stitch onto the main fabric at either end.

Flip the first pocket back piece, and press.
Topstitch, being careful to ensure that your stitching does not run off the edge of the welt.
Make sure that the fabric of the second piece is not under your presser foot.

Push the first pocket bag piece through the slit.
STEP NINE :

Now to deal with the pocket bag.
In the photo, you can see a little triangle flap of interfaced fabric. This also needs to be stitched down to "seal" the ends of the cut in your fabric, to stop these from popping back through.
The edge of the pocket bag that is folded over needs to stay folded over, as this will stop any unsightly lumpiness or twisting of the finished pocket.
When you are stitching the pocket bag, you will be working with the outside of the garment uppermost. So to access where the pocket bag is underneath your garment, you will need to lift the jacket front and fold it back on itself - as can be seen in the above photo.

When stitching, imagine you are stitching a line across the bottom of the triangle.
I am right handed, so I tend to start with the right hand side of the welt / pocket. Stitch across your little triangle, down onto the pocket bag until you get to your first corner.
As you move around the pocket bag, stitching, you need to ensure that the welt and pocket layers remain in place. Some people pin so that the two layers remain aligned. I tend to sew pin free, so largely just use my free left hand to do that part of the job, and my right hand to guide the fabric around under the presser foot.

Once your pocket bag is stitched, give it a quick press.
You might find that the layers have shifted, especially if the fabric you are using for the pocket bag is particularly slippy. If that is the case, unpick that part, release the excess and restitch. As you get more practiced, you will find that you need to restitch less and less.
STEP TEN :

Give your new pocket a quick press.
Then all that remains is to top stitch the welt in place.
Depending on what look you are going for, you can either topstitch by machine, or you can hand stitch from underneath,taking care to not have your hand stitches show from the outside of the garment. I generally topstitch by machine.
I start my first stitch with my needle going through the fabric, butted up against the welt. The inside of my presser foot to needle is 1mm, so I have the inside edge of my presser foot against the edge of the welt.
Take care to not stitch below the bottom edge of the welt. I generally do this part one stitch at a time using the "one stitch" button on my machine, or by hand cranking it and I set my stitch length to 2mm.

Et voilà! There you have one perfect tailored welt pocket!
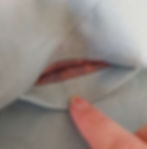
The diagonal creases coming out from the bottom of the welt are from turning the jacket on itself when stitching the pocket bag, and pressed out.